Everything you need to know
If you’re dealing with slow, unreliable internet in rural Jamaica, whether you’re in the hills of St. Ann or the countryside of Westmoreland, you’re not alone. Many Jamaicans have struggled with traditional internet services or service providers that has live nodes in your area due to low subscribers.
Starlink represents a significant improvement over traditional satellite internet. Unlike older satellite systems that rely on a few large satellites positioned 22,000+ miles above Earth, Starlink operates a network of thousands of smaller satellites in low-Earth orbit at approximately 340 miles altitude. This proximity enables download speeds of 100-200+ Mbps with latency as low as 20-40 milliseconds, a substantial upgrade for areas where traditional broadband infrastructure is limited or unreliable.
Hardware and Pricing
The Starlink kit costs approximately JMD$60,500, plus an additional 3000 for shipping and handling, as of early 2025 (roughly USD$380-400). Some local suppliers might provide the kit at a more significant cost of up to $90,000. This is because its available at hand and you wont have to wait 2 weeks. Plus they charge an additional price for installation. While this represents a significant upfront investment, the price includes:
- Complete hardware kit
- DHL international shipping
- Customs clearance and duties
- Local delivery
Additional accessories like Ethernet adapters and mesh networking equipment are available through shop.starlink.com or amazon.
Monthly Service: Approximately JMD$7000 for unlimited residential data.
Delivery and Logistics
Starlink partners with DHL for shipping to Jamaica. Delivery typically takes 1-2 weeks to urban areas with complete addresses, though customs processing can extend this to 3-6 weeks in some cases.
Rural delivery considerations:
- Packages are delivered to the nearest DHL service point rather than directly to rural addresses
- Common pickup locations include Half Way Tree (Kingston area) and Montego Bay service centers
- You’ll receive notification when your package is ready for collection
- Ensure your service address matches your intended installation location for proper activation
Installation Process
The basic setup process involves:
- Downloading the Starlink mobile app
- Connecting the router to power
- Positioning the dish with clear sky visibility
- Following app guidance for optimal placement
The dish requires an unobstructed view of the sky, trees, buildings, or other structures can significantly impact performance.
Professional Installation Services
For those preferring professional installation, Lignum Tech provides comprehensive Starlink setup services across Jamaica. Our services include:
- Complete system installation and configuration
- Integration with existing home networks
- Optimal dish positioning and mounting
- Performance testing and optimization
- Additional equipment installation (Ethernet adapters, mesh systems)
Contact Information:
- Phone: 876-919-6046
- Website: lignumtechservices.com
- Service areas: Montego Bay, Negril, Ocho Rios, and island-wide
Is Starlink Right for You?
Starlink works best for:
- Rural properties with limited broadband options
- Areas experiencing frequent outages with traditional ISPs
- Users requiring reliable high-speed internet for work, education, or entertainment
- Properties with clear southern sky exposure
Considerations:
- Higher upfront cost compared to traditional internet plans
- Performance can be affected by weather conditions
- Requires clear line of sight to sky
- Monthly costs are competitive with premium broadband packages
Getting Started
To order Starlink for your Jamaican location:
- Visit starlink.com and enter your service address
- Complete the order with payment
- Track shipment through DHL
- Arrange pickup if delivery is to service center
- Install system or schedule professional installation
Getting Your Starlink Through DHL
Here’s the thing about DHL delivery in Jamaica… it’s not quite as straightforward as you’d hope.
If you’re lucky enough to live somewhere with a proper street address, you know, actual house numbers, lot numbers, the works, then yeah, they’ll bring it right to your door. Easy.
But let’s be real. Most of us don’t have those fancy addresses. I mean, how do you explain to a delivery guy that your house is “the blue one past the mango tree, turn left after Miss Carmen’s shop”?
So here’s what actually happens. Your Starlink kit gets delivered to the closest DHL location instead. Could be Half Way Tree if you’re in the Kingston area, maybe Montego Bay if you’re up that way.
Then you wait for the call. And trust me, they will call, usually when you’re least expecting it. “Your package is here, come sign for it.”
That’s your cue to hop in the car (or catch a taxi) and head to their office. Quick signature, grab your box, and you’re good to go.
Not the end of the world, really. Just means a little extra trip on your part. But hey… at least you know it’s safe and waiting for you, right?
Setting up
The standard non-actuated Starlink 3rd Gen kit box has dimensions of approximately 26 x 18 x 4 inches. The packaged unit weighs about 15 pounds.

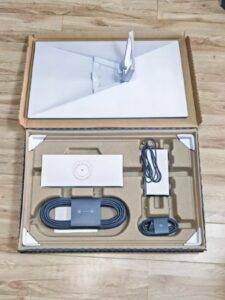
Whats in the box:

The Starlink Dish (aka the Terminal): That’s the flat, futuristic panel (about 15 inches wide) that locks onto those low-Earth orbit satellites. It’s got an IP67 weatherproof rating, so rain or shine (or that random Jamaican downpour), it holds up. No more motorized tilting like the old actuated version—this one’s fixed but smart, auto-adjusting its beam for the best signal.
Gen 3 Wi-Fi Router: The brains of the operation. This bad boy supports Wi-Fi 6 (tri-band, 4×4 MU-MIMO for smooth multi-device vibes), covers up to 3,200 sq ft, and big upgrade, has two built-in Ethernet ports. Finally, no awkward adapters if you’re wiring in a desktop or smart TV. Powers everything with a DC input, keeps things tidy.
Kickstand/Base: Simple pipe adapter for ground or roof mounting. Sturdy enough for most spots, but if you’re on a windy hilltop, grab their optional permanent mount later.
Starlink Cable: A hefty 50-foot (15-meter) outdoor-rated cord to hook the dish to the router. Long enough to snake through walls or across a yard without feeling shortchanged.
Power Supply and AC Cable: The wall wart and cord that juices up the router, plugs into standard outlets, no fancy converters needed.
Install:
Download the Starlink App
Scan the QR code to download the Starlink App.

2 | Install the Cables

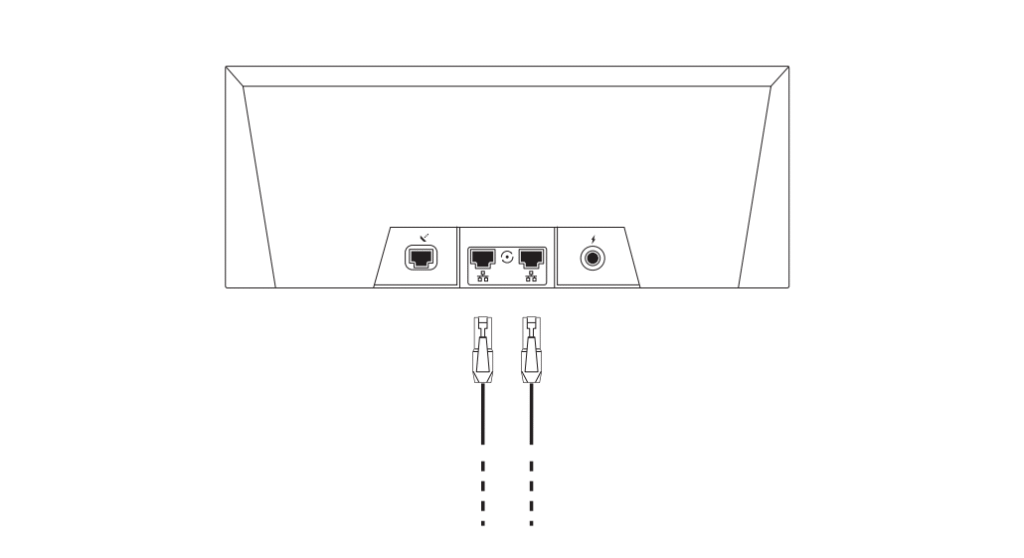
Lift the kickstand and plug one end of the provided cables into your Starlink with the cable locking feature facing up. Ensure the plug is
fully inserted such that the plug face is flush with the surface. To remove cable, pull firmly outward as there is no release tab.
Route the other end of the Starlink cable to your Router and plug it into the port number 1 indicated with the antenna symbol on the back
of the router.
Plug the Gen 3 Router into a power outlet using the power cable and power supply.
3 | Find A Clear View of the Sky

Your Starlink needs a clear view of the sky so it can stay connected with satellites as they move overhead. Objects that obstruct the
connection between your Starlink and the satellite, such as a tree branch, pole, or roof, will cause service interruptions. Use the
obstruction tool in the App to ensure you have selected a suitable mounting location.
If you could not find a clear field of view from the ground level, consider installing in an elevated location, like a roof, pole, or wall.
Additional mounts and accessories are available for purchase on the Starlink Shop.
4 | Connect and Align Starlink

5 | Connect to WiFi

Step through the Starlink install process on the Starlink App. Once connected, an alert on the App will show if you need to rotate
Starlink to be properly aligned. Click the alert to use the alignment tool
- On your device, find and connect to the STARLINK network in your WiFi settings.
- Once connected, a browser window will open prompting you to enter a new SSID (Network name) and password.
This step is optional but recommended. - You are now connected! Open the Starlink App to customize additional settings, check your connection, and more
Using the Extra RJ45 Ports

- Remove the RJ45 cover.
- Plug in your own ethernet cable to port 1 or 2. Connect the other end of your cable to your wired mesh or 3rd party hardware.
CONCLUSION:
Starlink in Jamaica: Should You DIY or Go Professional?
Those endless buffering wheels spinning while you’re trying to stream? We’ve all been there. Out in the parishes where internet drops faster than a ripe breadfruit, you’re probably done with old school satellite internet that crawled slower than Sunday morning traffic.
The app walks you through alignment. The dish automatically aims itself using some pretty cool technology. Connect your devices and run speed tests. You should see 150 to 250 Mbps download speeds with about 25 ms latency.
Sounds easy, right? But that “30 minute” setup can stretch if your roof is steep, cables need routing through walls, or you’re dodging coconuts to find clear sky. Some spent an hour fighting with a loose mount before everything clicked.
Why Professional Installation Makes Sense
DIY is great if you love challenges, but why wrestle with it? One wrong angle and your signal is spotty. A loose cable leaves you offline mid Netflix. Climbing ladders in the sun to adjust the dish? Not fun.
That’s where Lignum Tech comes in. We’re Starlink installation professionals covering all of Jamaica, from Montego Bay to Mandeville. We’ve done dozens of setups, from hillside villas to coastal properties.
What we handle:
We scout your location and find the perfect dish placement with no tree interference. Everything gets secured to handle hurricane force winds while you relax with a cold drink. We optimize settings for maximum speed and handle any Ethernet or mesh networking you need for whole house coverage.
Cables get routed cleanly, the router synced properly, and the app configured correctly. We test your speeds before leaving to make sure everything works perfectly.
Local expertise:
We’re based right here on the island. Call 876-919-6046 or visit lignumtechservices.com. No waiting for overseas tech support or trying to explain Jamaica addresses to foreign call centers.
Making the Choice
DIY costs nothing extra beyond your time and maybe some frustration. But factor in the hours spent, potential cable issues, or that moment when everything’s blinking red and you don’t know why.
Professional installation gives you peace of mind. You’re online fast with no headaches, optimized settings, and proper mounting that won’t fail during the next hurricane.
What’s your situation like? Dealing with hills, trees, or tricky roof access? Whether you want to tackle it yourself or have us handle everything professionally, the goal is the same: getting you connected to reliable high speed internet.
Ready to make the switch? Contact Lignum Tech at 876-919-6046 or lignumtechservices.com. Let’s get your Starlink running properly from day one.
Schedule Starlink Installation Today
Do you want to reach out for more information or see how we can help you ?Reach out to us by clicking on the button bekow